Hands-On: Secured Credential Provisioning Demo with Infineon OPTIGA™ Trust M and CommScope PKIWorks®
In the ever-expanding world of IoT, device authentication and data security have become critical priorities. Public Key Infrastructure (PKI) plays a foundational role in establishing trust across connected systems. However, managing cryptographic keys and certificates securely—especially at scale—remains a significant challenge for many manufacturers.
Infineon’s OPTIGA™ Trust M offers a robust solution to this challenge. This secure element provides tamper-resistant storage for private keys, X.509 certificates, and device identities. It supports industry-standard cryptographic algorithms such as ECC (Elliptic Curve Cryptography), RSA, AES, and SHA, and communicates over an I²C interface, making it easy to integrate with a wide range of embedded platforms.
To further streamline secure provisioning, a CommScope-specific SKU of the OPTIGA™ Trust M is available. This variant can be provisioned either at the factory or in the field using CommScope’s PKIWorks® provisioning server—giving OEMs the flexibility to optimize manufacturing processes without compromising on security.
Demonstration Overview
To showcase this joint solution, we’ve prepared a demonstration that highlights the secured provisioning of the OPTIGA™ Trust M using CommScope’s PKIWorks® server and provisioning SDK. The demo illustrates how the components come together to enable trusted device identity and credential management in an embedded environment. You can watch a short video of the demo here.
This blog walks you through running the demo using pre-built executables. While the demo highlights provisioning the OPTIGA™ Trust M over Wi-Fi, the broader goal is to showcase the key components and steps involved in the provisioning process. At the end, we also provide instructions for building the demo from source.
Required Software Components for Demo
The following software components are required to run the demo.
- Infineon’s ModusToolbox™ Software includes all the essential tools for flashing firmware to the chip and serves as the primary IDE for building both the SDK and application.
-
CommScope’s PKIWorks® Software package includes these four sub-directories:
- Demo_Firmware_Executable – directory containing the provisioning firmware to flash into MCU.
- Demo_Firmware_Project – CommScope’s PKIWorks® SDK and demo project workspace directory to build the demo application.
- Demo_Firmware_Source - CommScope’s PKIWorks® SDK and demo source code directory to build the demo application from scratch.
- Demo_UI – directory for UI application to interact with MCU’s provisioning firmware.
The PKIWorks® software package can be obtained by following these steps:
- Go to the CommScope’s Infineon partner’s page “Contact Us” form here and submit a request for the OPTIGA™ Trust M demo package in the “Comments” section.
- Wait for an invitation email from CommScope to grant you access to the CommScope software distribution system, SODIACS®.
- Follow the instructions in the invitation email to download the client from SODIACS®.
Required Hardware Components for the Demo
- OPTIGA™ Trust M (CommScope SKU) - Secure element preloaded with CommScope’s root of trust certificate for device authentication.
- OPTIGA™ Trust Adapter for Arduino - Interface board that connects the TAE board to the host MCU using I²C via an Arduino-compatible header.
- PSOC™ 62S2 Wi-Fi BT Pioneer Kit - Host microcontroller development board that runs the demo provisioning firmware and communicates with the OPTIGA™ Trust M.
- Windows PC (Windows 10 or higher) - Required for development tools, programming the MCU, and running the demo application.
If you need assistance acquiring the hardware, please reach out to Julie Huang at Julie.Huang@infineon.com.
Hardware Setup

Running the Demo in Windows
- Connect PSOC™ 62 Pioneer Kit to a Windows machine via the USB cable provided.
-
Install Provisioning Firmware to MCU using the following steps.
- Download and install ModusToolbox™ Software.
- Locate and unzip the downloaded PKIWorks® Software “Infineon_PKIWorks_Client_2.x.x.zip”.
- In Windows Search box, search for “modus-shell” and launch it.
-
Locate and change directory into ~/Infineon_PKIWorks_Client_2.x.x/Demo_Firmware_Executable.
Note: “~” in the above path stands for the parent directory of Infineon_PKIWorks_Client_2.x.x. You need to replace it with the actual directory where you put Infineon_PKIWorks_Client_2.x.x. For example, if Infineon_PKIWorks_Client_2.x.x is downloaded under C:/temp, you need to change the above path to C:/temp/Infineon_PKIWorks_Client_2.x.x/Demo_Firmware_Executable.
-
Execute flash.sh to upload the provisioning firmware to MCU.
Note: The flash.sh script is designed for use with Modus Toolbox v3.5 or Modus-Shell v1.5. If you're using a different version of Modus-Shell, you may need to update the paths to “/openocd/bin” and “/openocd/scripts” within the script.
For example, in Modus Toolbox v3.4 or Modus-Shell v1.4, the highlighted path, “C:/Infineon/Tools/ModusToolboxProgtools-1.5” needs to be replaced with “~/ModusToolbox/tools_3.4” in flash.sh as shown below.

For future modus-shell versions, we are expecting the path needs to be updated to “C:/Infineon/Tools/ModusToolboxProgtools-1.X”.
-
Start Demo UI Application
- Locate ~/Infineon_PKIWorks_Client_2.x.x/Demo_UI directory.
- Update Infineon.exe.config with available wifi_ssid and wifi_password info.
- Double click Infineon.exe and start the demo UI.
-
Run the demo by pressing the SW1 button shown below. This step can be repeated as many times as needed.

-
Confirm the successful provisioning in Demo UI application below with the certificate information that will appear in the lower left corner.
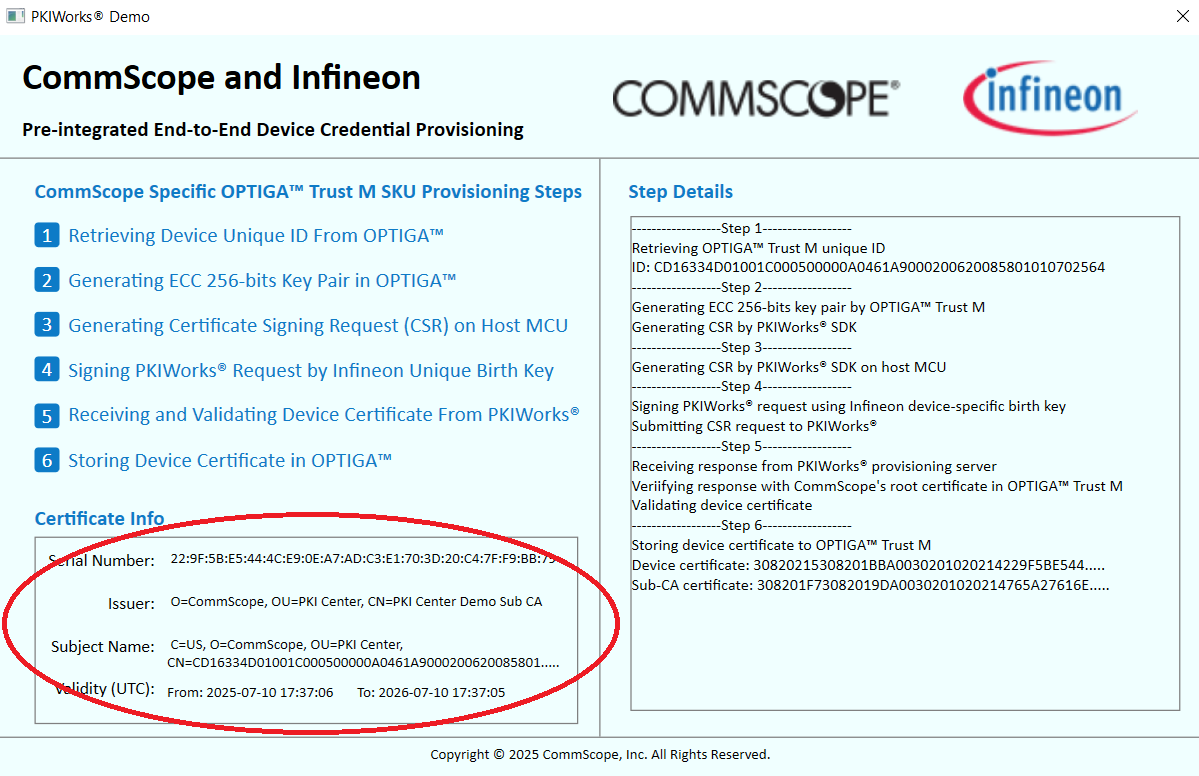
-
After successful provisioning, the device certificate and the corresponding private key are saved in the following OPTIGA™ Trust M slots. The key and certificate are ready for intended crypto operations.
- Slot 0xE0E8 stores the device cert.
- Slot 0xE0F1 stores the private key.
Building the Demo from a Project Workspace
While pre-built demo binaries are available, you may want to build the demo yourself on your specific platform from the pre-configured project workspace directory. Build instructions from the project workspace are provided below.
- If needed, download and install ModusToolbox™ Software.
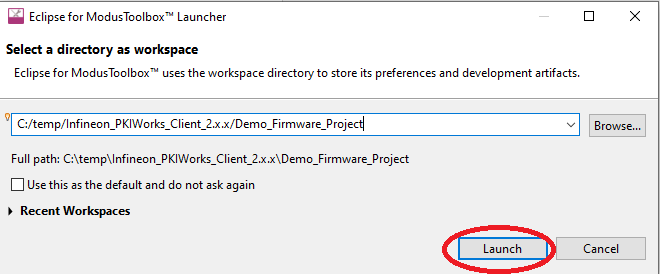
- Locate the ModusToolbox Workspace directory, ~/Infineon_PKIWorks_Client_2.x.x/Demo_Firmware_Project. Make sure there is no space in the absolute path above.
-
Launch “Eclipse for Modus Toolbox” application.
Note: In the example shown below, the workspace directory is C:/temp/Infineon_PKIWorks_Client_2.x.x/Demo_Firmware_Project. You will need to change the path to your workspace directory.
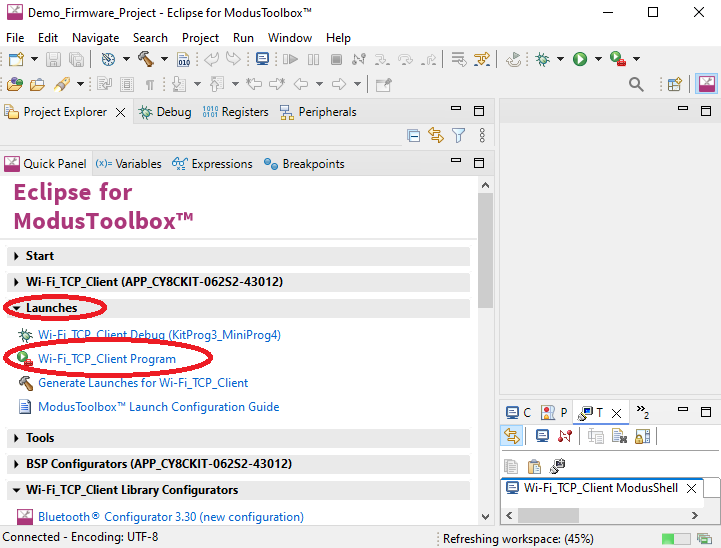
- All project configurations are already set up and the project is ready to build.
- Build Wi-Fi_TCP_Client project.
- Connect PSOC™ 62 Pioneer Kit to a Windows machine via the USB cable provided.
-
Flash the newly built provisioning firmware into MCU and launch it as shown below.
- Start the demo by repeating steps from step 3 of “Runing Demo on Windows" session above.
Building the Demo from Source Code
You may also want to create and build the demo yourself to better understand the integration process, customize it for your specific platform, or enable debugging and development. Instructions for building the demo from scratch using CommScope’s PKIWorks® Client SDK are provided below.
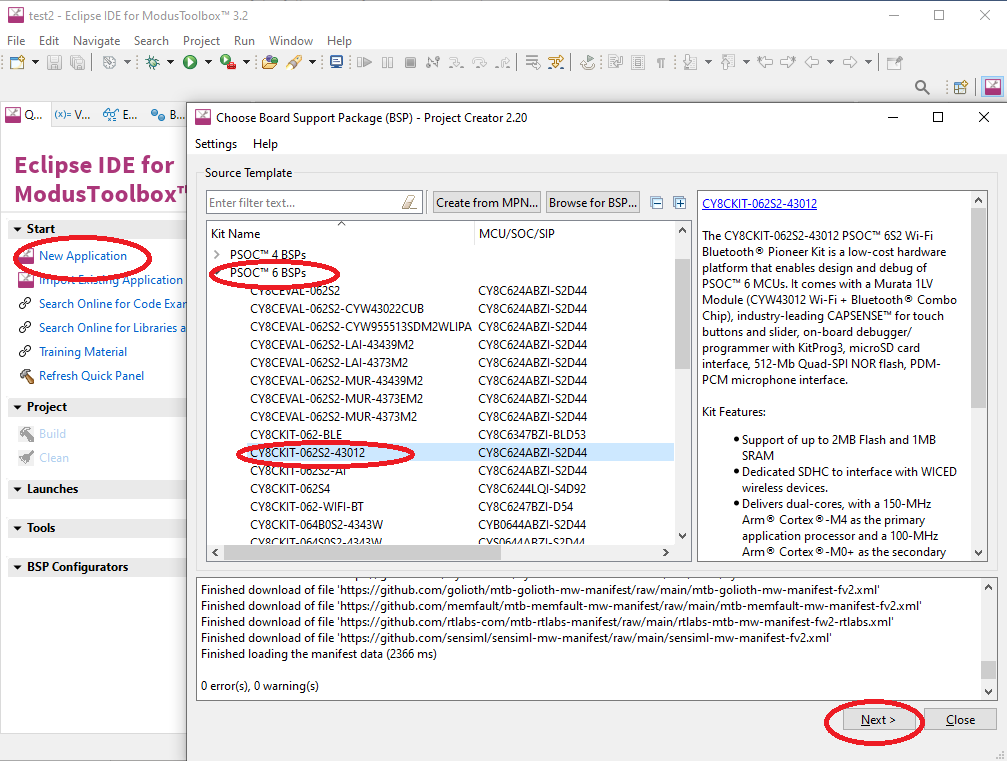
- If needed, download and install ModusToolbox™ Software.
-
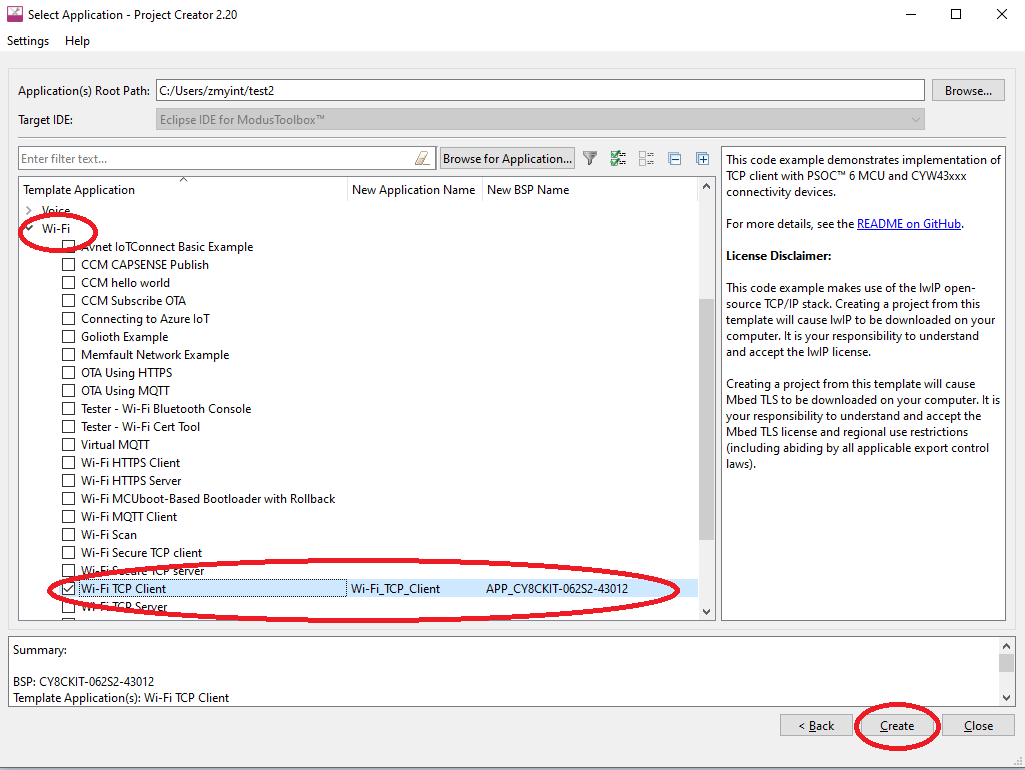
Create a new application for PSOC™ 6 BSPs and CY8CKIT-062S2-43012.
-
Create a Wi-Fi TCP Client application named Wi-Fi_TCP_Client.
-
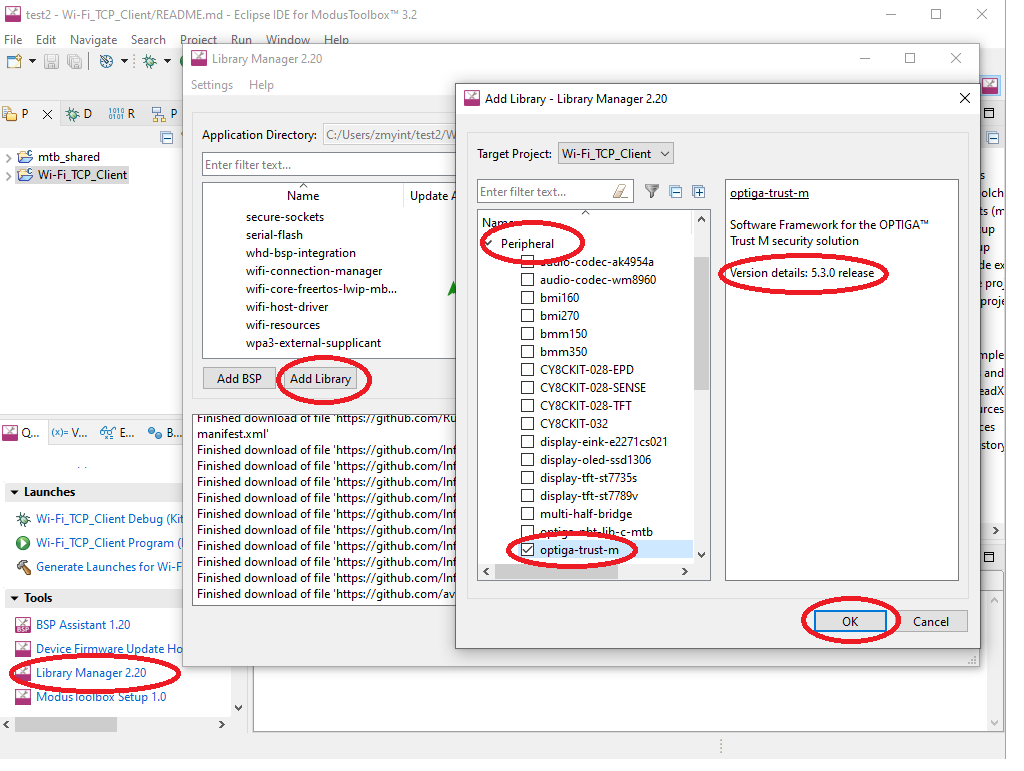
Using Library Manager, add an additional library – Peripheral->optiga-trust-m v5.3.0.
-
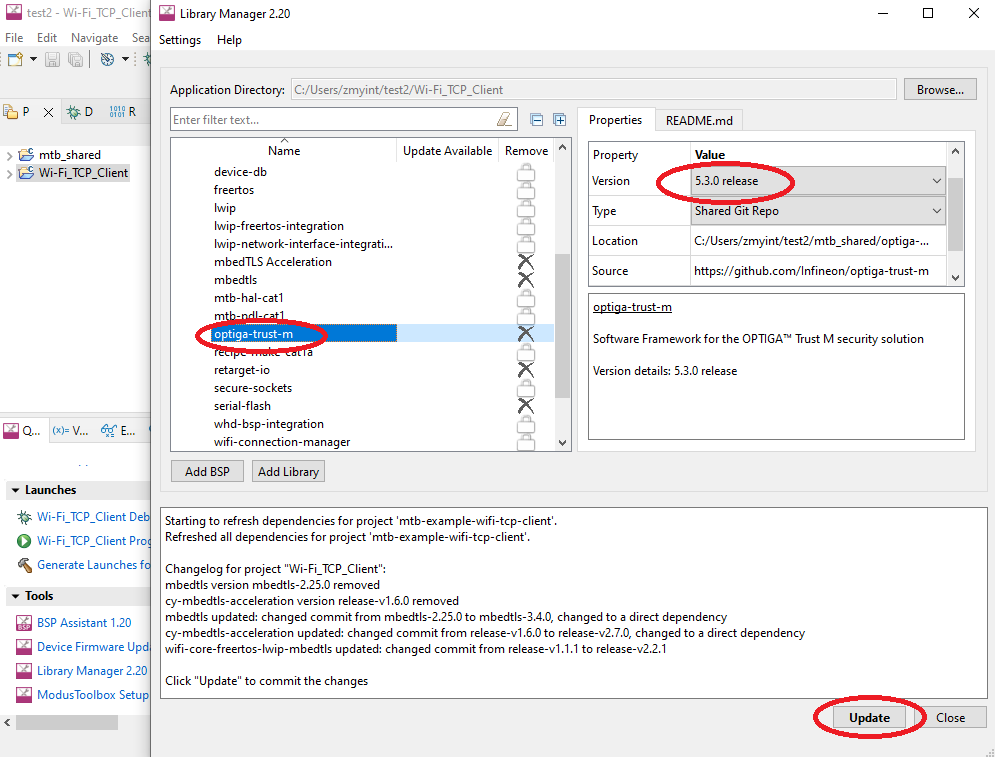
Update mbedtls and the related libraries to the required versions as below. It will take a while to update and install the selected packages.
- mbedtls -> Stable 3.4.0 release
- mbedTLS Acceleration -> v2.7.0 Release
- wifi-core-freetos-Iwip-mbedtls -> 2.2.1 release
- There are multiple mbedtls codes in the project after adding the optiga-trust-m library. The directory, ~\mtb-shared\optiga-trust-m\release-v5.3.0\external\mbedtls and all sub-directories must be deleted.
-
Add the followings definitions at the end of ~\mtb_shared\cy-mbedtls-acceleration\release-v2.7.0\mbedtls_alt_config.h.
#define MBEDTLS_ECP_DP_SECP256R1_ENABLED #define MBEDTLS_ECP_DP_SECP384R1_ENABLED #define MBEDTLS_ECP_DP_SECP521R1_ENABLED - Replace ~\Wi-Fi_TCP_Client\Makefile with the downloaded ~/Infineon_PKIWorks_Client_2.x.x/Demo_Firmware_Source/Makefile.
- Copy all files and directory from the downloaded PKIWorks Essentials package/Demo_Firmware_Source/Source directory and save them in ~/Wi-Fi_TCP_Client/source directory by overwriting files with the same names.
- Build Wi-Fi_TCP_Client project.
- Connect PSOC™ 62 Pioneer Kit to a Windows machine via the USB cable provided.
-
Flash the newly built provisioning firmware into MCU and launch it as shown below.

- Start the demo by repeating steps from step 3 of “Runing Demo on Windows" session above.
Software Development on Any Platform
If your target hardware platform is not PSOC™ 62 Pioneer Kit, you can still integrate Infineon’s OPTIGA™ Trust M and CommScope PKIWorks Client SDK with your application. To better understand the PKIWorks SDK, you can request the high-level diagrams, sequence diagrams and API definitions here. You can also find the OPTIGA™ Trust M library related sources below.
- https://github.com/Infineon/optiga-trust-m/
- https://github.com/Infineon/linux-optiga-trust-m
- https://github.com/Infineon/optiga-trust-m/tree/develop/pal/NEW_PAL_TEMPLATE
Conclusion
This blog on our demo illustrates how CommScope’s PKIWorks® provisioning platform and Infineon’s OPTIGA™ Trust M secured element work together to enable robust, scalable device identity and credential management. Whether you're evaluating the joint solution, integrating it into your own platform, or exploring secured provisioning workflows, the steps outlined in this guide provide a clear path to getting started. For additional details or support, please contact CommScope here.